Pagdens' artificial swarm
Every beekeeping association that runs a winter course for beginners will teach swarm control. In almost every case they use the artificial swarm method that evolved from that promoted by James Pagden (1814-1878). So universal is this teaching that the terms ‘Pagden’ and ‘artificial swarm’ are used almost interchangeably.
Swarm control – defined below – is an important skill in beekeeping. It saves your bees from bothering the neighbours and by not losing swarms you increase your honey crop. Furthermore, understanding the principles may help apply some related queen rearing techniques.
I’m planning a few posts on swarm control this season and realised I’d never described the ‘classic’ artificial swarm – possibly because I don’t often use it∇. To avoid referencing other sites with more or less comprehensive (or correct) descriptions I’ve catalogued the ‘bare bones’ of the process here.
Swarm control
Swarm control and prevention are two different things. The latter are the steps taken to stop a colony from ‘thinking’ about swarming, e.g. young queens and ample space. In contrast, swarm control are what is needed once there are signs that swarming by the colony is imminent. The most common sign is the discovery of unsealed, charged (i.e. occupied) queen cells during an inspection. You practise swarm prevention to prevent, or at least delay, the need for swarm control. Once swarm control is needed many beekeepers use Pagdens’ artificial swarm.

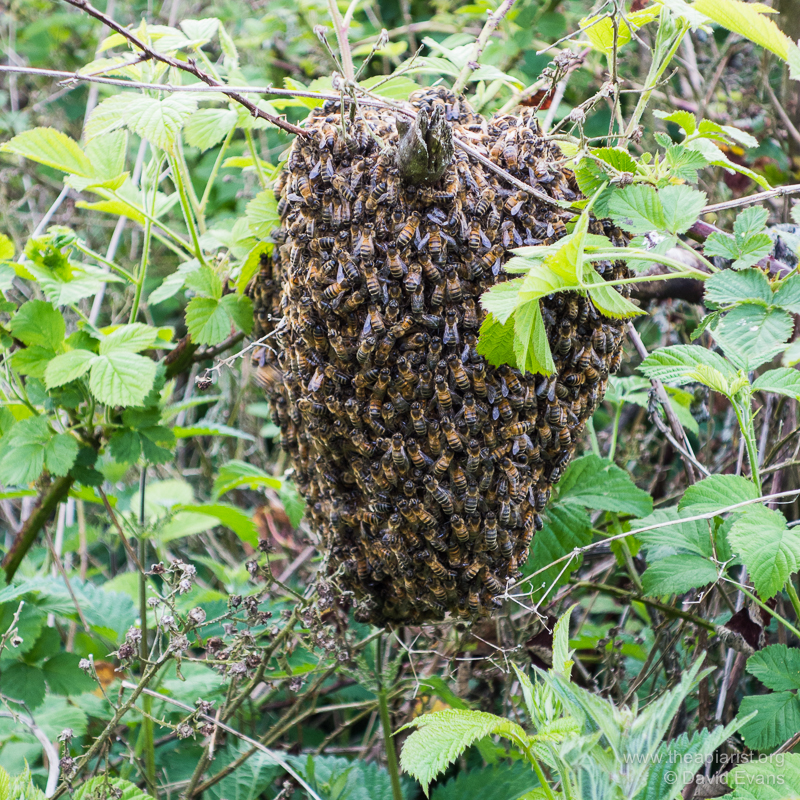
A small swarm …
If you discover sealed queen cells during an inspection there’s a good chance your swarm prevention didn’t work and that it’s too late for swarm control. Colonies with unclipped queens usually swarm when the developing queen cells are capped. If there are sealed queen cells and no sign of the queen or eggs then they’re probably hanging in a tree or occupying a bait hive by now.
The artificial swarm
The principle of the artificial swarm is to separate the queen and flying bees from the brood and nurse bees. This is achieved by a couple of simple colony manipulations. These exploit the tendency of flying bees to return to the location of the hive they were reared in, or more accurately, the location of the hive from which they took their orientation flights. If you remember this it all makes sense.

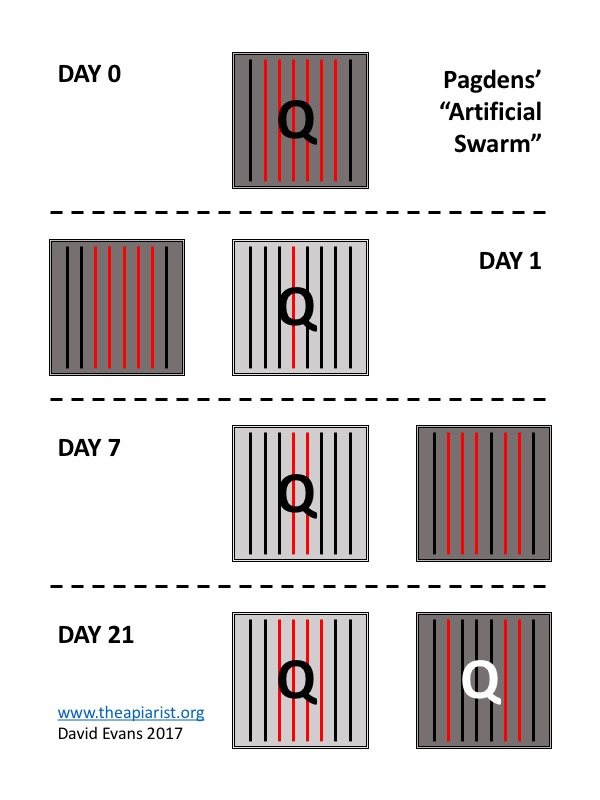
Pagdens’ artificial swarm …
The diagram is colour coded. The original hive location is the centreline of the image. The old hive is mid-grey, the new hive is light-grey. Brood-containing frames are red, foundation or drawn comb is black. The queen is indicated Q (black if mated, white if a virgin or recently mated). The timings of the manipulations are indicated.
Day 0 and Day 1
During a routine inspection of a strong colony anytime from mid-April to late June (depending upon the season) you discover unsealed, charged queen cells. Don’t panic‡. Collect the necessary equipment for an artificial swarm – a complete new hive consisting of a floor, brood box and full complement of frames (preferably some or all are drawn comb, the rest can be just foundation – or foundationless frames), a crownboard and a roof. An additional hive stand is also useful, though not essential.

Don’t panic …
In the diagram I’ve assumed that it takes a day to collect this lot and get back to the apiary† … whatever, once you’re ready, proceed as follows.
- Move the old hive a couple of metres away from the original location. If there are supers present remove these and the queen excluder first, putting them aside.
- Place the new floor and filled brood box on the original site, with the entrance facing the same way as before.
- Remove two frames from the centre of the new brood box.
- Gently go through the old hive. Find a frame of open brood. Shake the frame gently to dislodge the flying bees, inspect it carefully, place the queen onto the frame and put it into the centre of the new brood box. There must be no queen cells on this frame. Push together the adjacent frames and add a spare frame so the hive is full.
- If there were supers present at the start place them on the new hive above the queen excluder. If there were no supers you might need to feed this colony some thin syrup to encourage them to draw new comb.
- Add the crownboard and roof to the new hive.
- Push together the frames in the old hive, add one more frame, put the crownboard and roof back and leave them to get on with things.
What does this first manipulation achieve?
At the end of this first manipulation you’ve manually separated the queen from almost all the brood and nurse bees. The queen is in the original location in the new hive. All the flying bees will return to the original location – because that’s where they first orientated to – over the next day or so. This new hive is viable as it contains a mated queen, bees to support her and lots of empty space for her to lay in.
The old hive is also viable, but only of they first rear a new queen. Since there are open queen cells present these must be sealed to allow pupation and metamorphosis which takes 7 days.
Day 7
Move the old hive to the opposite side of the new hive. A couple of metres away is fine. Flying bees that have matured in the old hive during the preceding week will find the hive missing when they return from foraging. They’ll most likely enter the hive closest to the hive they flew from, which is the one with the queen in it i.e. the new hive on the original hive stand. This boosts the strength of the queenright colony. More importantly, it depletes the old hive of bees, making it less likely that they’ll throw off a cast if more than one virgin emerges§.
It’s important that the old hive is not interfered with after the first 7 days. There will be a new virgin queen present who will be going out on mating flights a few days after emergence. Leave this hive untouched for at least another fortnight. In the diagram above the black frame in the old hive indicates that the oldest brood is emerging, leaving plenty of young bees to tend to the newly mated queen and ample space for her to lay in due course.
Day 21+
The old hive should now contain a newly mated and laying queen. Inspections of this colony can start again. The new colony – on the original site – should be building up well.
If you want to increase your colony numbers (make increase), you’ve done so. If you don’t want to make increase then the two colonies can be united over newspaper. Remove the old queen first, either terminally (!) or by giving her to another beekeeper.
∇ I tend to prefer a vertical split for two reasons – it uses less equipment and it takes up less space. However, the underlying principles of the two processes are very similar as will be discussed in a future post.
† Day 0 and Day 1 can be done on the same day. I’ve separated them on the assumption that you’re as badly prepared as I am and don’t have piles of spare equipment waiting to be used in the apiary. The only thing to be sure of is not to let the queen cells be capped. If necessary knock back all the visible queen cells … once they’ve decided to swarm they will start more.
‡ I can never write those words without hearing them uttered in the voice of Lance Corporal Jones from the sitcom Dad’s Army. Since this was broadcast between 1968 and 1977 writing that last sentence makes me feel rather old.
§ I’m trying to steer well clear of the thorny problem of how many queen cells to leave in the old hive. That’s a separate topic in its own right. Some suggest letting the bees decide (i.e. do nothing), others leave one or two.
Join the discussion ...