Building bridges
The precarious scaffolding plank bridge that straddles the burn near my apiary got partially washed away during the heavy rainfall and flooding over the last few months. As the bee season is fast approaching and I need to shift some additional equipment and colonies to the apiary, I took advantage of a break in the weather to rebuild the bridge. Or, more accurately, put the planks back in place … ‘build’ makes it sound more than a 20 minute job, which is what it took. It’s a natural crossing point over the burn, as indicated by the roe deer hoof prints (‘slots’) in the soft mud on either side. Whether they’ll risk using the repositioned bridge remains to be seen. Whether it’ll survive discovery by the H+S people also remains to be seen 😉
- Before …
- After …
- Roe deer slots …
The apiary occupies a sheltered and sunny corner of open woodland, access is restricted – not least because the bridge is still pretty precarious – and it’s not possible to get a car particularly close to the site. Therefore everything of any size has to be wheeled there on Buster, my (t)rusty hivebarrow. It’s easy to jump across the burn – after all, the deer do it all the time – but I need the bridge for the hivebarrow.
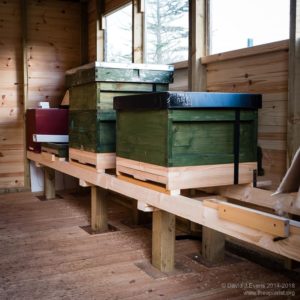
The apiary includes my bee shed, a 12 x 8 foot sturdy shed built onto a solid, level, slabbed foundation. The side of the shed that gets the morning sun has large bee-friendly windows. Inside, there’s a secure set of hive stands that are fixed, not to the shed, but to the underlying slabbed foundation. This ensures that vibrations caused by me wandering around inside the shed aren’t transmitted to the bees by the continued flexing of the floor. If you jump and land heavily on both feet in the shed the bees give a small roar of recognition/agitation. However, since I don’t normally pogo around my hives this isn’t an issue … during normal bumbling around the colonies they’re silent.
I’m new to bee sheds, so am still learning … time will tell whether the modifications I’ve made to help house the hives – largely suggested by generous contributors to the SBAi, gleaned from the internet or simply guessed at – are suitable. For example, the hive floors are currently bolted onto the hive stands to avoid my inevitable engulfment in escaped bees if one were to get bumped inadvertently. In some bee sheds I’ve read the hive entrances are simply lined up with a hole in the shed wall. However, for a variety of reasons I and others want to be able to work in the shed without beesuits, so I have entrance tunnels that connect the floor to the shed wall.
There are currently two colonies in situ. Both appear to be doing fine. Despite the temperature being appreciably warmer inside the shed (it’s unheated, but quickly warms once the sun is on it) they don’t fly if the outside temperature is too cold. On very cold days the colonies are tightly clustered. However, there are days when bees outside are clustered very tightly, but those inside are in a far looser mass. There’s also more evidence of activity within the colony – in terms of stores being uncapped and brood rearing. This isn’t to say that all similarly housed colonies would behave the same … the differences I see in the small number of colonies I’ve looked at might simply be due to genetic differences between the bees. Examination of the Correx Varroa boards shows the expected ‘stripes’ of wax granules from brood rearing and you can even see a few eggs that have been discarded and dropped through the OMF. The Varroa counts are very low. These colonies were treated by vaporisation about 8 weeks ago and have only dropped a couple of mites since then. However, I appreciate that mite drop counts are notoriously unreliable, but at least there aren’t hundreds 😉
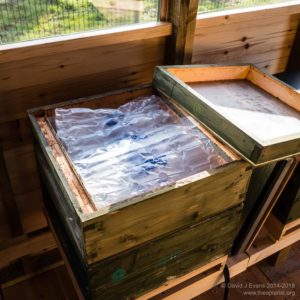
Several of my colonies had still not finished with their fondant blocks by late into November. These blocks had been housed over a queen excluder in an empty super, underneath the usual insulated perspex crownboard. To avoid a dead space above the colony I filled the super with some of that ‘inflated’ sealed plastic bag wrapping often supplied with packages from Amazon or similar mail-order suppliers. Bubblewrap can be used in the same way.
Far better this stuff is used than just dumped into a landfill …




Join the discussion ...